Driving Maneuvers — Parking, Hill Start, Roundabouts
Parallel and perpendicular parking, hill starts, three-point turns, and roundabouts. Each maneuver step by step with common mistakes to avoid.
Parking is the maneuver that causes more exam failures than anything else. Not because it's hard — but because most students fear it more than they need to. The truth is, all it takes is knowing the procedure, practicing it a few times, and following a few simple rules. Every maneuver an examiner can ask you to perform has a clearly defined sequence of steps. Once you know them, there's nothing to be afraid of.
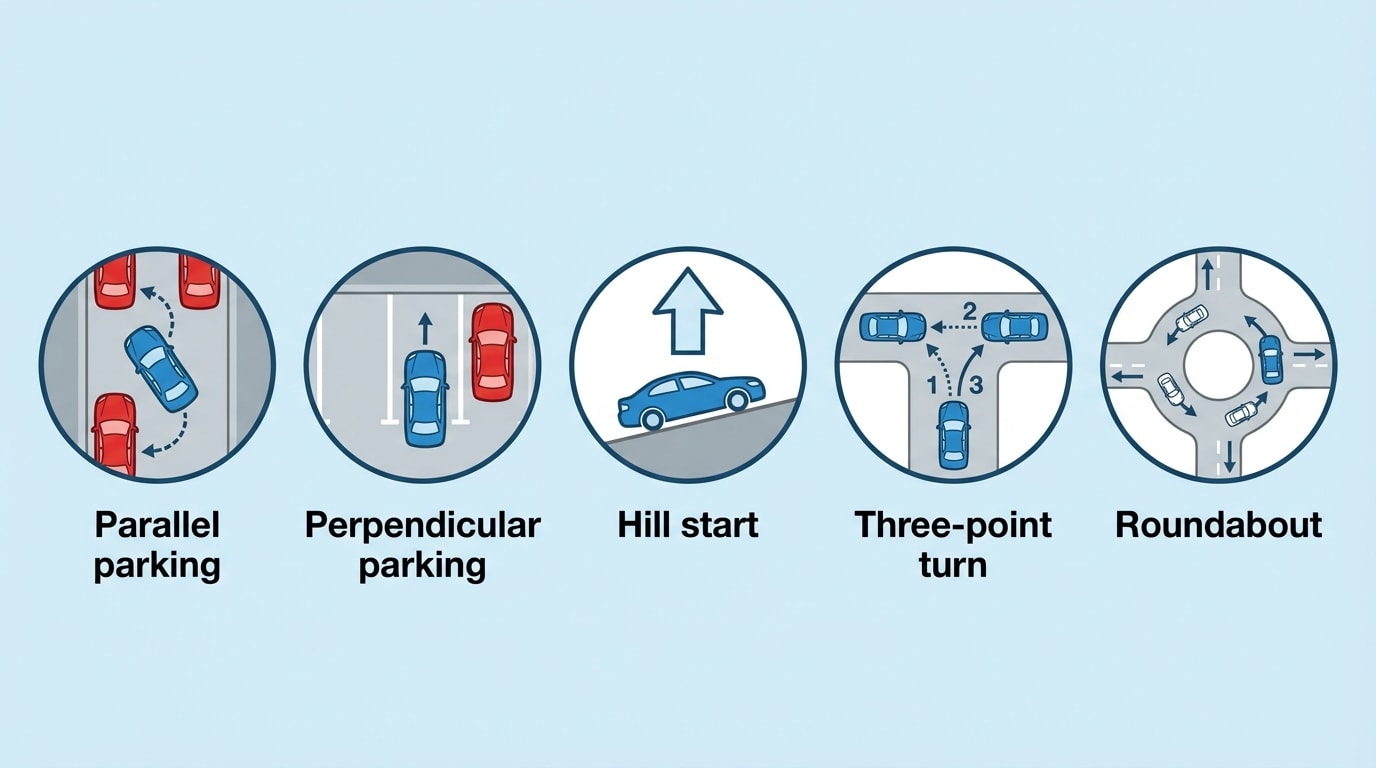
This chapter breaks down five key maneuvers you'll encounter during training and at the practical exam: parallel parking, perpendicular parking, hill starts, three-point turns, and roundabout driving. For each one, you'll get a precise procedure, the most common mistakes, and practical tips.
Maneuvers are practiced mainly during the first stage of practical lessons on the training ground, where you have room for mistakes without the pressure of traffic. How many hours are dedicated to maneuvers within the overall training and how the stages fit together is covered in the Training Process chapter. At the final exam, the examiner picks two or three of them, and you need to perform them safely and smoothly.
Quick summary:
- Decree No. 167/2002 Coll. (§19) requires category B exam candidates to demonstrate parallel and perpendicular parking (both forward and reverse), a three-point turn, and a smooth pull-away.
- The most common cause of failure on maneuvers: insufficient observation — the examiner watches for safety above all, not perfection.
- Hill starts are the most stressful maneuver for students, but rolling back a few centimeters isn't grounds for failure.
- At roundabouts, you do not signal when entering — you only use the right indicator when exiting.
Parallel Parking — The Classic You Don't Need to Fear
Parallel parking in reverse is the maneuver most students respect the most. Yet it's really a mechanical procedure — if you follow the steps and reference points, the car essentially "folds" itself into the gap. The key is that the rear wheels have a shorter turning radius than the front ones, so reversing into a tight gap is actually easier than driving in forward.
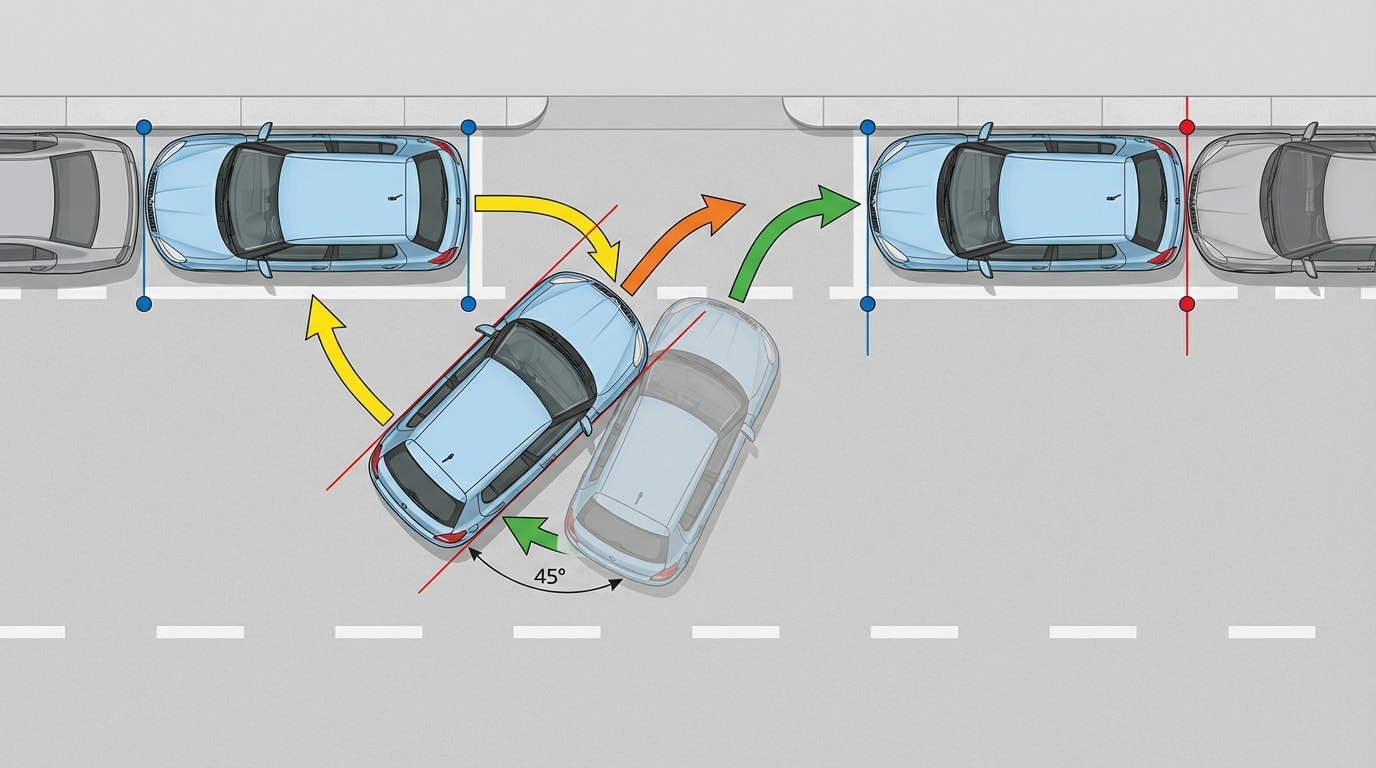
Start by finding a gap. The minimum size is the length of your car plus roughly 80 centimeters. For a comfortable entry, allow at least one and a half times the length of your car. Stop alongside the car in front so that your rear wheels are approximately level with its rear wheels. The gap between the two cars should be about one meter. Turn on your right indicator — this warns drivers behind you that you're about to park.
Now turn the steering wheel fully to the right and begin slowly reversing. The car angles into the gap at roughly 45 degrees. Watch for the reference point: once you can see in the rear-view mirror or over your shoulder that the left rear corner of the front car is aligned with the pillar of your rear window, stop. Straighten the wheel and continue reversing in a straight line. When your right mirror reaches the level of the front car's left rear corner, turn the wheel fully to the left and reverse until the car is parallel with the curb. Finally, center the car by moving forward and back so there's a reasonable gap in front and behind.
How to judge your distance from the curb
The ideal distance from the curb is 15–20 cm. More than 30 cm and the examiner will mark it negatively. A simple trick: look in your right side mirror — if you can see the curb just below the edge of the car, you're in the right spot.
The most common mistakes in parallel parking? Being too far from the curb, mounting the curb with the rear wheel, forgetting to signal, and above all — insufficient observation while reversing. The law (§24 para. 2 of Act No. 361/2000 Coll.) is clear: when reversing, you must not endanger other road users. In practice, this means: check your mirrors, turn your head, and if someone is crossing or driving behind you, stop and wait.
Perpendicular Parking — Why Reversing In Is Worth It
Perpendicular parking is what you'll find at every supermarket car park. At the exam, the examiner can ask you to park both forwards and in reverse — the decree (§19 para. 1(a) of Decree No. 167/2002 Coll.) requires both. However, parking in reverse is clearly easier, for the same reason as with parallel parking: the rear wheels follow a shorter arc, making the car more maneuverable.
When parking perpendicularly in reverse, drive past the parking space so that the rear of your car is roughly level with the side of the neighboring vehicle. Turn the steering wheel fully to the right and begin slowly reversing — really slowly, clutch only, no accelerator. Continuously check both side mirrors and monitor the distance from neighboring cars. Once your car is parallel with the cars on either side, straighten the wheel and reverse into the full depth of the space. At the end, verify that you have roughly equal gaps on both sides — at minimum enough to open the doors.
Parking forwards requires more space. You need to approach in a wide arc, so you start further from the space — roughly one and a half lane widths away. Full lock to the right, a gentle entry, straighten the wheel once you're in. The advantage of reversing in also shows when you leave: you can see the road and don't have to reverse blindly into traffic.
Watch the blind spot
When parking perpendicularly in reverse, the blind spot is your biggest enemy. Before you start reversing, look over your shoulder on both sides. Mirrors don't show everything — especially small children or low obstacles.
Most common mistakes: not leaving enough room when approaching (the car can't complete the arc and you have to restart the maneuver), reversing too quickly, failing to check the blind spot, and forgetting to signal. Another classic is the rear of the car sticking out into the driving lane — check your mirror to make sure your car doesn't extend past the parking bay line.
Hill Start — You'll Manage, Even If You're Scared
Of all maneuvers, the hill start is psychologically the hardest. You're standing on a slope, the car wants to roll backward, and you need to coordinate three things at once: clutch, accelerator, and brake (or handbrake). The good news: there's a straightforward procedure that always works. And here's more good news — rolling back a few centimeters is normal and won't cause you to fail the exam.
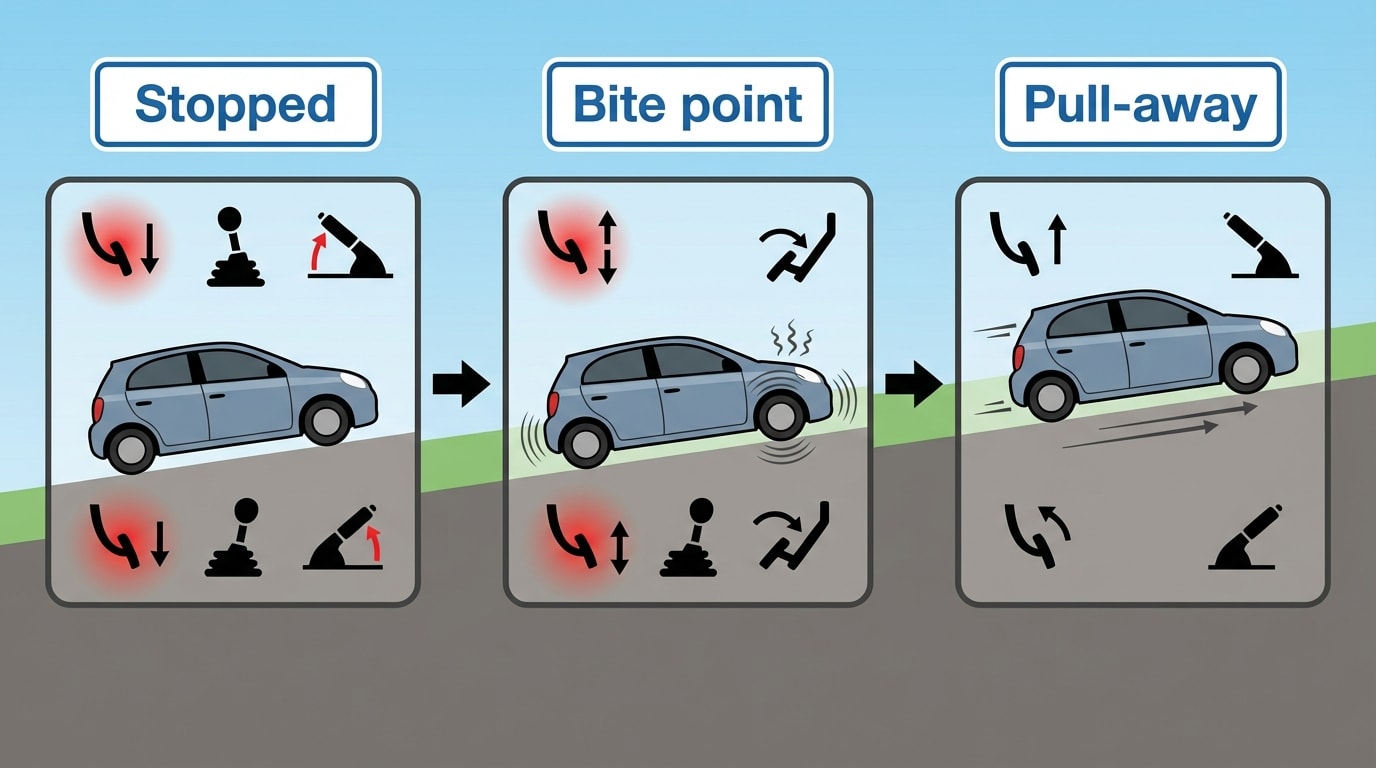
With the handbrake (the easier option, ideal for beginners): You're standing on a hill with the clutch fully depressed, first gear engaged, and the handbrake pulled up. Gently add throttle to steady RPM — aim for around 1,500 to 2,000 RPM. Now slowly release the clutch and feel for the so-called bite point. You'll recognize it: the car begins to vibrate gently, the RPM dips slightly, and you feel the engine "pulling" forward against the handbrake. At that moment, press the handbrake button and slowly lower the lever. The car moves forward. Continue slowly releasing the clutch and you're rolling.
Without the handbrake (more advanced): Your right foot is on the brake, your left foot depresses the clutch, first gear is engaged. Slowly release the clutch to the bite point — the engine begins to vibrate. Now you need to quickly but smoothly move your right foot from the brake to the accelerator. In that brief moment, the car may roll back a centimeter or two — that's fine. Gently add throttle and continue releasing the clutch.
The key concept behind this entire maneuver is the clutch bite point. This is the moment when the clutch disc begins transferring torque from the engine to the wheels. Recognizing it is a matter of feel — you'll sense a slight vibration, the RPM drops, the car "tenses up." The more you practice, the faster you'll find it. Most instructors dedicate an entire lesson to this, because mastering the bite point is the foundation of all further driving.
Modern cars have an assistant
Many newer cars are equipped with Hill Start Assist (HSA) — after you release the brake on a hill, the brakes hold automatically for 2–3 seconds. In driving school, however, you learn on a manual without this assistant, because you need to master the technique yourself. Electronic aids won't help you at the exam.
Most common mistakes: releasing the clutch too abruptly (the car bucks and the engine stalls), insufficient throttle (the engine stalls and the car rolls back), too many revs combined with a sudden clutch release (wheel spin, clutch wear), and panicking at a slight rollback. The last mistake is the sneakiest — the student rolls back two centimeters, panics, lifts their feet off the pedals, and the car rolls back a meter. Stay calm: a slight rollback is normal.
Three-Point Turn — Simple, But Watch the Traffic
The three-point turn is used on narrow roads where there isn't enough space to turn in a single arc. The law (§24 para. 1 of Act No. 361/2000 Coll.) states that the rules for turning at intersections apply equally to U-turns — meaning you must yield to oncoming traffic and must not endanger anyone.
The procedure is straightforward. First, make sure the road is clear in both directions. Signal left. Turn the steering wheel fully to the left and slowly pull forward — stop just before the opposite curb. Now turn the wheel fully to the right, shift into reverse, and slowly back up — stop just before the curb on your side. Finally, turn the wheel left again, shift into first, and pull forward into the correct lane. The whole maneuver takes three movements — hence the name.
What to watch out for? Check for traffic between each step. Don't turn where it's prohibited — the law (§24 para. 4) forbids turning at locations with poor visibility (bends, hilltops), at signalized intersections, at pedestrian crossings, at railway crossings, in tunnels, and on one-way streets. On one-way streets, reversing is only permitted for pulling into or out of a parking space.
Where turning is prohibited (§24 para. 4)
You must not turn at locations with poor visibility, at signalized intersections, at pedestrian crossings, at railway crossings, in tunnels, or on one-way streets. If visibility is restricted, the law requires you to ensure safety with the help of a competent person — such as a passenger who guides you.
Most common mistakes during a three-point turn: the student doesn't check traffic between each step, needs more than three movements (signaling insufficient steering control), mounts the curb, or blocks traffic because they chose an unsuitable location.
Roundabouts — Signal Only When Exiting
Roundabouts are a special topic because even many experienced drivers make mistakes on them. The basic rule: at a roundabout marked with both the "Roundabout" sign and the "Give Way" sign, vehicles already on the roundabout have priority (§22 para. 5 of Act No. 361/2000 Coll.). In Czechia, the vast majority of roundabouts are marked this way. If a roundabout doesn't have the "Give Way" sign, standard right-of-way rules apply — but that's the exception.
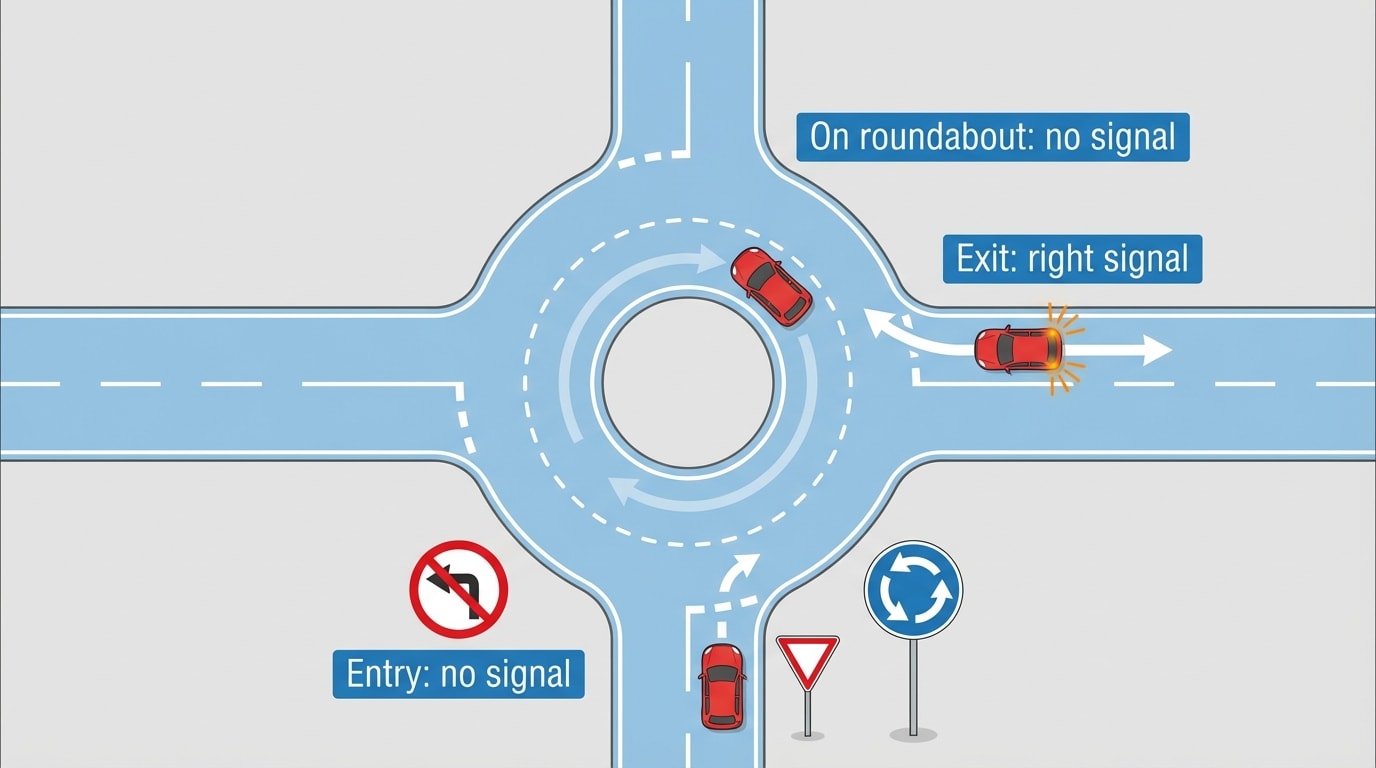
Now for the most important point that most people don't realize: you do not signal when entering a roundabout. Not at all. The law (§30 para. 5) states that indicators are not used when entering or driving around a roundabout. You only signal when exiting — right indicator just before you leave the roundabout. If you signal left when entering, the examiner will mark it as a mistake. And many experienced drivers still get this wrong.
At a multi-lane roundabout, choose your lane based on where you want to exit. The right (outer) lane is for exiting at the first (nearest) exit. The left (inner) lane is for continuing around and exiting at a more distant exit. Follow the road markings and lane arrows. Changing lanes on the roundabout follows the standard procedure: mirror, signal, blind spot check, then merge.
Before entering a roundabout, slow down to approximately 20–30 km/h, look to the left (where cars on the roundabout are coming from), and wait for a safe gap. Most common mistakes: using the left indicator when entering, forgetting the right indicator when exiting, choosing the wrong lane on a multi-lane roundabout, and confusing exits when counting — count your exit in advance so you don't miss it.
What the Examiner Evaluates During Maneuvers
When you're sitting at the practical exam and the examiner says "park parallel," they're not just checking whether you fit into the gap. Decree No. 167/2002 Coll. (§19 para. 4) sets five criteria the examiner uses to evaluate every maneuver: smoothness (no jerky movements or stalling), accuracy (car within the lines, not on the curb), safety (continuous observation, mirrors, indicators), vehicle control (correct gear changes and clutch work), and economy (appropriate RPM, no unnecessary revving).
Certain mistakes lead to immediate failure — contact with another vehicle while parking, the examiner needing to intervene, hitting a pedestrian, or running a red light. But minor imprecisions (being a few centimeters further from the curb, a slight jerk on pull-away) aren't grounds for failure. The examiner evaluates overall performance, not a single small detail.
Where to practice maneuvers after driving school
An empty supermarket car park on a weekend morning is the ideal place to practice parking. PET bottles or cones make great training markers. Any gentle slope will do for hill start practice. And if you want extra confidence, a refresher lesson with a driving instructor costs CZK 800–1,200 per hour.
Summary
- Parallel parking in reverse follows a clear sequence of steps — the keys are reference points (rear wheel level with the neighbor, rear window pillar) and slow steering.
- Perpendicular parking in reverse is easier than forward and also makes leaving the space simpler.
- Hill starts with the handbrake are manageable for everyone — find the clutch bite point and don't panic at a slight rollback.
- The three-point turn must be completed in three movements, on a clearly visible stretch of road, with continuous traffic checks.
- At roundabouts: no indicator when entering, right indicator when exiting. Vehicles on the roundabout have priority.
- The examiner evaluates safety and smoothness, not perfection — minor imprecisions are no reason to panic.
Key Terms
| Term | Explanation |
|---|---|
| Parallel parking | Pulling into a gap between two cars parallel to the curb — in reverse or forward |
| Perpendicular parking | Pulling into a parking space at a right angle to the curb (typical in car parks) |
| Clutch bite point | The moment when the clutch starts transferring torque to the wheels — recognized by vibration and an RPM drop |
| Three-point turn | Turning a vehicle on a narrow road using three movements: forward left, reverse right, forward left |
| Roundabout | A circular intersection where vehicles travel counter-clockwise |
| Hill Start Assist (HSA) | An electronic hill-start assistant — holds the brakes for 2–3 seconds after the brake pedal is released |
| Dual controls | A second set of clutch and brake pedals on the instructor's side in the training vehicle |
| §24 of Act No. 361/2000 Coll. | Legal regulation of turning and reversing — rules, prohibitions, obligations |
| §22 para. 5 of Act No. 361/2000 Coll. | Roundabout priority rule — vehicles on the roundabout have right of way |
| §30 para. 5 of Act No. 361/2000 Coll. | Roundabout signaling — indicator only when exiting, not when entering |